According to the requirements of ASME BPV Ⅸ-2015 standard, the appearance, ultrasonic and magnetic particle inspection were carried out after welding, and the results were all qualified. The appearance of the welded seam is inspected, and is uniform and beautiful; there are no defects such as surface gas holes, slag inclusions, undercuts, and cracks.
2. Mechanical properties tests of welded joints
According to the ASME BPV Ⅸ-2015 standard, cut suitable samples for testing mechanical properties, and conduct tensile, bending and impact, hardness and macroscopic tests.
(1) The tensile test results are shown in Table 4. The tensile strength of the welded joints of carbon steel pipes is 345MPa higher than that of the base metal, which meets the requirements of ASME IX standard.
Table 4 Tensile tests of welded joints
| Items | Width/mm | Thickness/mm | Tensile strength/MPa | Locations of fractures |
| A1 | 19.89 | 13.97 | 469 | Welding seams |
| A2 | 20.48 | 13.85 | 475 | Welding seams |
(2) Bending tests: specimens are taken along the thickness direction of the joint for side bending tests Test conditions: The diameter of the indenter is 40 mm, and the bending angle is 180°. The test results showed no defects and met the requirements of the project
(3) Hardness and macroscopic tests: The macroscopic appearance of the welding seam of the carbon steel joint is shown in Figure 3. Through the macro inspection of the welding seam, it was found that the welding seam was welded well and had no defects such as cracks.
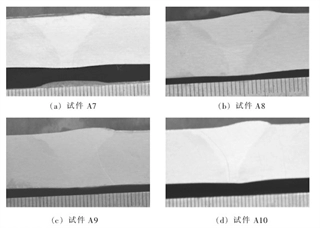
Figure 3 The macro morphology of the welding seam
According to ASTM E92-2009 standard, HVA-10A type microhardness tester was used to measure the hardness of four areas, including welding seams, fusion zones, heat-affected zones and base metal of specimens A7 and A8, and the load was 100N. The schematic diagram of the location of hardness measurement points is shown in Figure 4.

Figure 4 The schematic diagram of the location of ASTM E92 hardness measurement points
The hardness measurement results are shown in Figure 5. The maximum hardness value of the carbon steel joint is HV10237, which is located in the welding seam part and meets the standard requirements.
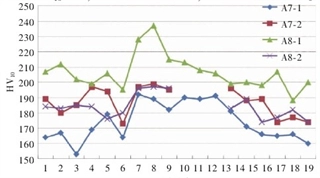
Figure 5 Hardness distribution of specimens A7 and A8
According to ISO 6507-1-2005 standard, HVA-10A type microhardness tester was used to measure the hardness of four areas, including welding seam, fusion zones, heat-affected zones and base metal of specimens A7 and A8, and the load was 100N. The schematic diagram of the position of hardness measurement points is shown in Figure 6, and the measurement results are shown in Figure 7. The hardness measurement results show that the maximum hardness value of carbon steel is HV10207, which meets the requirements of the hardness of ISO 15156 in an acidic medium environment.
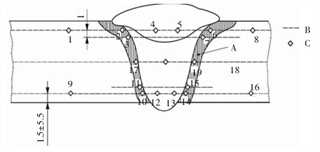
Figure 6 The schematic diagram of the location of the hardness measuring points in ISO 6507-1
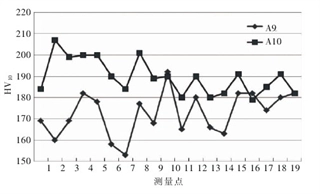
Figure 7 The distribution of hardness of samples A9 and A10
3. SSC tests of welded joints
The welded joint samples were subjected to sulfur-induced stress corrosion cracking (SSC) for 720 hours under the test conditions of NACE TM0177-Solution A with 99.5% hydrogen sulfide gas, pressure 0.1 MPa (1 bar), and temperature (24±3)°C.
After the 720-hour test, the pulled surface of the sample was macroscopically inspected with a magnification of 10 times before cleaning. The macroscopic photo of the SSC sample is shown in Figure 8. The macroscopic test of the pulled surface showed no indication of SSC or SOHIC in the 3 parallel samples.
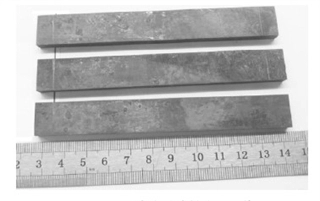
Figure 8
The test results show that the tensile surface of the three welded joint samples was examined under a low magnification microscope with a magnification of 10 times after 720 hours, and there was no crack on the tensile surface. Therefore, the sample was insensitive to sulfur-induced stress corrosion cracking or stress-directed hydrogen-induced cracking under the above conditions.
4. HIC tests of welded joints
The welded joint samples were subjected to a 96-hour hydrogen-induced cracking (HIC) test in NACE TM0284-Solution A; the ratio of solution volume to sample area was greater than 3 mL/cm2, and the temperature was (25±3)°C. After the test, the sample was cut by wire cutting according to the standard, and the sample is inspected in the specified direction. The processing drawing is shown in Figure 9. The inspection surface of the sample is subjected to metallographic polishing, and then the polished surface was carefully observed under a metallographic microscope with a magnification of 100 times. The geometric parameters of the crack are measured, and the crack rate is calculated according to the corresponding formula.
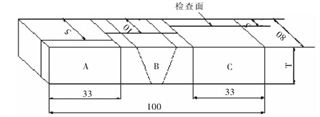
Figure 9 Crack analysis and processing after the HIC test
Areas A and C are the base metal area, and area B is the welding seam area. A, B, and C are all observed at a magnification of 100 times to calculate CLR, CTR and CSR (cracked areas with metallographic cracking photos, no cracked areas without photos)
The test results of the tensile surface show that after 96 hours of hydrogen-induced cracking (HIC) tests, the crack length rate CLR of the sample is 0%; the crack thickness rate CTR is 0%, and the crack sensitivity rate CSR is 0%.
5. Conclusion
(1) Select the appropriate welding wire and fully automatic argon arc welding equipment to weld carbon steel process pipelines of 101.6 mm (4 inches), and the mechanical properties of the welded joints can meet the relevant requirements of the ASME IX standard and match the base metal.
(2) According to the ISO 6507-1-2005 standard, the maximum hardness value of carbon steel is HV10207, which meets the requirements of hardness in ISO 15156 in an acidic medium environment.
(3) In an acidic medium environment, the corrosion resistance of SSC and HIC meets the requirements of ISO 15156.