Abstract
This study analyzes the factors that affect the ultrasonic testing results of hot-rolled titanium alloy seamless tubes. The analysis reveals that defects in the inner wall rolling grooves of these tubes significantly influence ultrasonic testing outcomes. These defects result in elevated noise levels, reduced sensitivity, challenges in differentiating between noise and defect signals, an increased false alarm rate, and can even cause the ultrasonic testing system to miss defects. In contrast, the equiaxed and dual-phase microstructures of hot-rolled titanium alloy seamless tubes, after heat treatment, have negligible impact on ultrasonic testing results. However, tubes with a rolled lamellar microstructure show higher noise levels and greater sound energy attenuation.
2. Effect of Surface State on Ultrasonic Testing Results
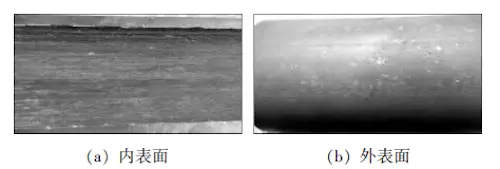
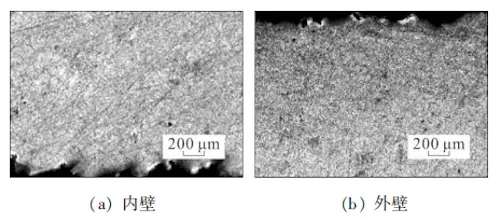
Titanium alloys are known for their poor thermal conductivity, low fluidity, and narrow thermoplastic range. As a result, microdefects tend to form on the surface during the hot rolling process, particularly during the tension reduction stage. Due to significant deformation and low temperatures, the surface condition of the finished tube is adversely affected, with numerous longitudinal extrusion groove defects on the inner wall, as shown in Figure 1. Cross-sectional analysis revealed that the depth of the inner wall groove defects ranged from 0.05 to 0.20 mm, exhibiting a sawtooth-like pattern. Figure 2 illustrates the partial morphology of the cross-section of the hot-rolled titanium alloy seamless tube sample.
(a) Inner surface (b) Outer surface
Figure 1 Surface condition of hot-rolled titanium alloy seamless tube
(a) Inner wall (b) Outer wall
Figure 2 Partial morphology of the cross-section of the hot-rolled titanium alloy seamless tube
Mechanical property tests, HS stress corrosion tests, and other evaluations of the hot-rolled titanium alloy seamless tubes show that while the surface condition does not affect the material's performance, it significantly impacts ultrasonic testing, leading to false positives and missed defect detection. In A-type pulse reflection ultrasonic testing, the clutter observed on the oscilloscope screen is primarily caused by three factors: electrical interference from the ultrasonic equipment, surface scattering due to the workpiece's roughness, and microstructural noise (body noise).
2.1 Online Automatic Ultrasonic Testing of Rolled Material
The test sample was an 88.90 mm x 7.34 mm hot-rolled titanium alloy seamless tube, with longitudinal and transverse artificial defects induced in accordance with relevant standards. U2 flaw detection criteria were used for evaluation. During initial testing, it was observed that the longitudinal and transverse artificial defects were unstable, and certain channels were inconsistent in detecting the artificial dents. After verification, a full-body alarm was triggered during flaw detection, indicating a longitudinal external defect. Figure 3 shows the waveform of the automatic line flaw detection for the finished titanium alloy seamless tube.
Rotating the tube body by 90° and 180°, changing the forward direction of the tube's head and tail, and reducing the forward speed did not significantly reduce the clutter signal, which triggered the full-body alarm. Samples were collected from the four quadrants at both the head and tail ends of the titanium alloy tube. After polishing, no defects greater than the acceptable depth of 0.36 mm were observed under a microscope. After repeated tests, the flaw detection results remained consistent. Preliminary analysis suggested that the issue was linked to the surface conditions of both the inner and outer tube walls, with the reflection wave from the inner wall groove defect contributing to high clutter levels or wave interference, which triggered the alarm.
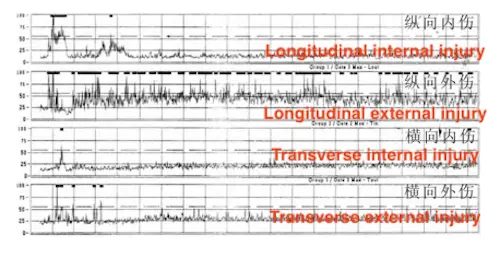
Figure 3 Automatic line flaw detection waveform of finished titanium alloy seamless tube
2.2 Surface State Comparison Test
To evaluate the impact of the surface state of hot-rolled titanium alloy seamless tubes on ultrasonic testing results, both online automatic and manual ultrasonic tests were conducted.
(1) Automatic Ultrasonic Testing of Semi-Finished Titanium Alloy Seamless Tubes
A 178.00 mm x 8.00 mm titanium alloy seamless tube, before sizing, was tested using online ultrasonic testing, and the corresponding flaw detection waveform is shown in Figure 4. Since the tube had not yet undergone sizing, its surface condition was optimal, with no longitudinal rolling defects on the inner wall. The ultrasonic inspection was successful, with no significant noise alarms detected. The flaw detection was repeated six times, producing consistent results.
(2) Surface Treatment Comparison of Finished Titanium Alloy Tubes
A sample of titanium alloy seamless tube, measuring 88.90 mm x 7.34 mm, was divided into four sections, each treated with a different grinding process. In Section 1, the inner wall was ground to a depth of 0.2 mm. In Section 2, both the inner and outer walls were ground to a depth of 0.2 mm. In Section 3, the outer wall was ground to a depth of 0.2 mm, while the rolling micro-defects on the inner wall were nearly eliminated. In Section 4, the inner wall was ground to a depth of 0.1 mm, leaving axial micro-defects on the inner wall while the outer wall retained its original surface condition.
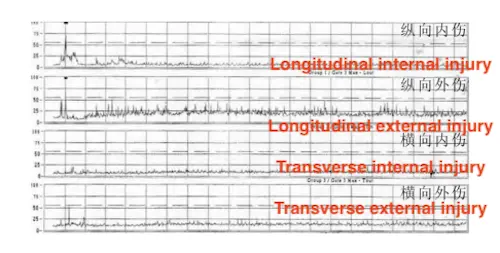
Figure 4 Flaw detection waveform of semi-finished titanium alloy seamless tube
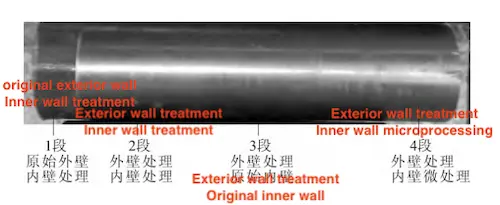
Figure 5 Surface treatment of titanium alloy seamless tube
A comparative analysis of the 'pass wave' detected using a manual contact method with a bidirectional oblique probe, with a frequency of 2.5 MHz and a chip size of 12 mm x 10 mm, was conducted. The 'pass wave' amplitude for each sample was adjusted to 80% of the maximum signal range, with all other parameters kept constant. The sample pipe was moved along the same axis. The gain of the ultrasonic detection waveform for titanium alloy seamless pipes with different surface conditions was observed to vary significantly. The results are shown in Table 1. The largest gain difference, 15 dB, was observed between Sections 2 and 3, which could also be influenced by coupling factors and irregularities in the pipe wall. However, the primary contributor is the inner surface condition of the titanium alloy seamless pipe. The ultrasonic detection waveforms for the 'pass wave' of titanium alloy seamless pipes with different surface conditions are shown in Figure 6.
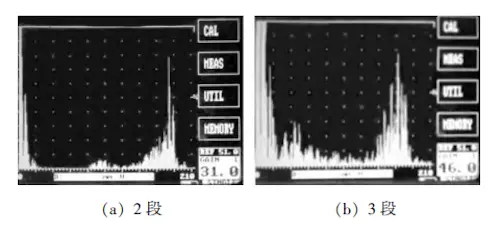
(a) 2 segments (b) 3 segments
Figure 6 Ultrasonic 'through wave' detection waveform for titanium alloy seamless tubes with different surface conditions
Due to surface defects or roughness on titanium alloy seamless tubes, sound waves are scattered and attenuated, reducing sensitivity during sample tube calibration or dynamic flaw detection. Additionally, the uneven distribution of groove defects on the inner wall of hot-rolled titanium alloy tubes—ranging from deep to shallow, wide to narrow, and sparse to dense—causes variations in the clutter, defect, and 'through wave' amplitudes displayed on the oscilloscope as the probe scans different areas. This leads to unreliable flaw detection stability.
The analysis indicates that the surface condition of hot-rolled titanium alloy seamless tubes—particularly the rolling groove defects on the inner wall—has a significant impact on ultrasonic detection results. The surface condition of the tube cannot be controlled during production because of the inherent properties of titanium alloy. Although many of the rolling micro-defects on the inner wall do not exceed standard specifications, they contribute to high noise levels, reduced sensitivity, difficulty distinguishing noise from defect signals, and a higher false alarm rate. As a result, automatic ultrasonic testing equipment may be unable to detect these defects. Rolling defects on the outer surface of hot-rolled titanium alloy tubes generally do not exceed 0.1 mm in depth, while those on the inner surface are typically deeper and denser. Therefore, the condition of the inner wall is a critical factor in ultrasonic testing outcomes.
3. The Influence of Microstructure on Ultrasonic Testing Results
The microstructure of titanium alloy products is closely linked to their mechanical properties and is influenced by various hot processing parameters, including billet heating temperature, holding time, heating rate, deformation speed and extent, cooling rate, and heat treatment process. Common microstructures found in titanium alloys include lamellar, equiaxed, basket-like, dual-phase (equiaxed + beta transformation), and Widmanstatten structures. Since the basket-like structure forms only under specific temperature conditions during deformation, it is not present in hot-rolled titanium alloy seamless tubes. Additionally, the Widmanstatten structure is not generally produced through heat treatment process control. Therefore, the influence of these structures on ultrasonic shear wave flaw detection is beyond the scope of this study.
The microstructure of hot-rolled titanium alloy seamless tubes under different heat treatment conditions is shown in Figure 7, with the microstructure at the head and tail of the rolled material shown in Figure 8. Previous studies on the relationship between titanium alloy microstructure and ultrasonic noise levels have primarily focused on bars or forgings. These studies investigate the correlation between microstructure and noise during longitudinal wave detection, often using flat-bottom holes to assess noise levels. However, ultrasonic detection of hot-rolled titanium alloy seamless tubes typically uses shear wave testing, and there is limited research on the correlation between microstructure and noise levels in these tubes.

(a) Rolled lamellar structure (b) Low temperature annealed equiaxed (α+β) structure (c) High temperature annealed dual state (α+β) transformation structure
Figure 7 Microstructure of hot-rolled titanium alloy seamless pipe under different heat treatment conditions
To evaluate the effect of various microstructures on ultrasonic detection results in hot-rolled titanium alloy seamless tubes, a series of experiments were conducted. The test sample tube specifications were 88.90 mm × 7.34 mm, using a 2.5 MHz probe frequency and a 12 mm × 10 mm chip size with a bidirectional oblique probe. To eliminate the effect of surface conditions on the ultrasonic testing results, the inner and outer walls of the tube were processed to remove rolling micro-defects, ensuring consistency in ovality and wall thickness. After processing, the tube's specifications were modified to 88.00 mm × 6.00 mm. The tube was then heat-treated with different processes to obtain the corresponding microstructures, and ultrasonic testing was performed using longitudinal waves.
Since transverse waves propagate in a 'sawtooth' pattern along the tube wall, the amplitude of the 'pass wave' or 'clutter wave' was used to assess the effect of the microstructure on the ultrasonic testing results. The ultrasonic testing waveforms for titanium alloy seamless tubes with various microstructures are shown in Figure 9, and the effects of different microstructures on shear wave testing are summarized in Table 2.
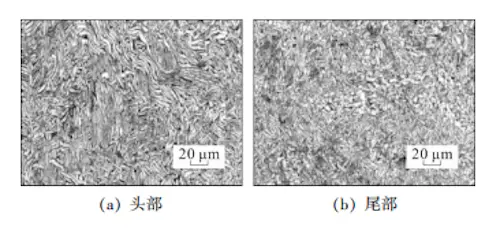
Figure 8 Microstructure morphology of hot-rolled titanium alloy seamless tube
Based on the preceding analysis, the influence of equiaxed and bimodal microstructures on ultrasonic testing results is minimal. These microstructures exhibit reduced sound energy attenuation, lower noise levels, and a uniform, undistorted structure that facilitates sound wave propagation. In contrast, rolled lamellar microstructures feature distinct lamellar layers with varying orientations, and the α-phase is elongated. As a result, this leads to higher noise levels and greater sound energy attenuation. Therefore, in shear wave flaw detection of hot-rolled titanium alloy seamless tubes, noise level and 'pass wave' amplitude are critical parameters for evaluating microstructure morphology and uniformity.
Table 2 Effect of different structures of titanium alloy seamless tube on shear wave detection
|
Titanium Alloy Microstructure |
Through Wave Amplitude (80% Gain Value) / dB |
Gain Value (50 dB) Clutter Amplitude |
|
Rolled Lamellar Structure |
41 |
40 |
|
Equiaxed Structure |
36 |
30 |
|
Dual Structure |
37 |
28 |

(a) Lamellar tissue (b) Isometric tissue (c) Bimodal tissue
Figure 9 Ultrasonic testing "through wave" waveform of titanium alloy seamless pipe with different microstructures
4. Conclusion
- The fundamentals of ultrasonic testing for hot-rolled titanium alloy seamless tubes are similar to those for conventional carbon steel seamless tubes. However, the surface condition and microstructure of titanium alloy tubes significantly affect the ultrasonic testing results. Therefore, when performing ultrasonic testing on these tubes, the comparison sample must match the heat treatment condition of the test sample.
- The surface condition of hot-rolled titanium alloy seamless tubes is a key factor influencing ultrasonic testing results, particularly defects such as inner wall rolling grooves. These defects can cause higher noise levels, reduced sensitivity, difficulty distinguishing between noise and defect signals, increased false alarms, and may even prevent the automatic ultrasonic testing equipment from detecting defects. In such cases, manual ultrasonic testing using the contact method may be required.
- The microstructure of hot-rolled titanium alloy seamless tubes is another significant factor affecting ultrasonic testing results. The equiaxed and bimodal microstructures have a minimal impact. However, ultrasonic testing of tubes with a rolled lamellar structure results in higher noise levels and greater sound energy attenuation. Therefore, for transverse wave flaw detection, the microstructure’s morphology and uniformity can be assessed by examining the noise level or 'through wave' amplitude.
- During the production of titanium alloy seamless tubes via the hot rolling process, addressing rolling groove defects on the inner wall is essential. Subsequently, the tube should be heat-treated to form either an equiaxed or bimodal microstructure, both of which are more favorable for accurate ultrasonic testing.