2.1.1 Analysis of causes of residual defects in tube blanks
The composition and structure of the billet will segregate in the casting process, and the hot-rolled tube billet after rolling may show a severe banded structure. In addition, there will be non-metallic inclusions in steel, which are compounds formed by iron and other alloying elements in steel and non-metallic elements such as O, S, N, etc. When the content of non-metallic inclusions in the tube blank is too high, especially after they are distributed in clusters and form large inclusions. Because this part has lost its metallic properties and has no connection with the steel matrix, it is easy to fall off and crack in the processing process. Starting from the smelting technology itself, controlling various parameters in the smelting process, reducing the metallurgical defect rate in pipes to be rolled, and eliminating or reducing various inclusions and element segregation are methods to solve the problem from the source.
2.1.2 Control of residual defects in tube blanks
The processing of finished stainless steel seamless pipes is a combination of cold drawing and cold rolling and a reasonable heat treatment process. Although some open defects existing on the surface of the pipe will be eliminated in the production process, for example, smooth pits at the bottom, the effect is limited. In order to achieve the goal of zero defects in the final product, it is necessary to control the quality of the tube blanks and conduct ultrasonic flaw detection of the same standard to ensure that the quality of the tube blanks is controlled according to standards close to that of the finished product, and to ensure that the flaw detection pass rate of the raw materials can reach 100%, avoiding the original defects of the tube blank and prevent them from being passed to subsequent processes, preventing them from being confused with defects in subsequent processing processes and resulting in the inability to correctly determine whether the defects are from the raw materials or produced during the processing.
On the basis of controlling the quality of the pipe blanks, the finished pipes made by one rolling and one retreat process are tested according to the original process. The qualified rate of ultrasonic flaw detection of the finished pipes can reach 90%, proving that the raw material of the pipe blanks which passed ultrasonic flaw detection will indeed help improve the qualification rate of ultrasonic flaw detection of finished pipes.
2.2 Defects in the rolling process of pipes
Since inner wall defects during pipe processing are mostly contact defects and pipes are in a solid solution state before rolling begins, with a hardness below HV170, under the action of compressive stress during processing, certain factors such as workpieces or foreign objects may easily cause damage to the surface of the pipe. Through long-term tracking and analysis of the company's production process, the following five factors were summarized and corresponding solutions were proposed.
2.2.1 The edges at the end of the rolling mandrel causing damage to the inner wall
The original mandrel has not been completely removed due to the machining marks on both ends. The front end surface of the mandrel is perpendicular to the center line of the mandrel, and there are sharp angles on the circumference. When the mandrel is withdrawn, the front end of the mandrel is in the hole pre-finishing part; the sharp end face of the mandrel will make some annular indentations on the inner surface of the pipe.
Solution: chamfer the front end of the mandrel to make the front end of the mandrel a smooth spherical surface, and replace the point and line contact forms with surface contact, thereby eliminating damage to the inner wall of the pipe by the front end of the mandrel.
2.2.2 Surface defects of connecting rods causing scratches on the inner wall
Because connecting rods are mostly homemade and do not have effective surface treatment, there are many defects on the outer surface of connecting rods. In the rolling process, the connecting rod will bend and deform in the inner hole of the pipe, and will rub against the inner wall of the pipe in the feeding process. The metal chips that fall off the surface of the connecting rod will further aggravate the damage to the inner wall of the pipe.
Solution: Replace all existing connecting rods with rods with Ra smaller than and equal to 0.5um.
At the same time, welding should be adopted for the connecting rod instead of threading to reduce the number of connected solder joints. At the same time, the outer wall should be polished before each use to eliminate surface defects of the connecting rod and attached metal debris to avoid scratches on the inner wall of the pipe.
2.2.3 Effect of enough lubrication of rolling oil on quality of the inner wall
In the rolling process, the metal will generate serious heat due to deformation and flow, and lubricating oil needs to be used for sufficient cooling. The original form of rolling oil lubrication is to apply lubricating oil to the connecting rod or fill the inner hole of the incoming material with oil. However, both methods have the problem of insufficient oil film on the inner wall. In the rolling process, the inner wall of the pipe may adhere to the mandrel, forming inner wall defects.
Solution: Install an immersion oil tank at the feeding end of the rolling mill, supplemented by a circulation device to ensure sufficient lubrication of the pipe. By controlling the soaking time, feeding length, feeding number and other details, the adequacy of rolling oil lubrication can be perfectly solved. In addition, attention should be paid to the cleanliness of the rolling oil, because during long-term recycling, there will inevitably be a lot of metal shavings in the lubricating oil, and metal shavings will also adhere to the lubricating oil pipelines, which will be pressed into the surface of the pipe in the rolling process. Therefore, while ensuring that the lubricating oil is fully infiltrated, it is necessary to ensure that the lubricating oil is clean, and the impurities in the oil must be cleaned regularly.
2.2.4 Burrs at the end of the pipe and impurities on inner walls causing serious damage to the inner wall
The incoming materials from the rolling mill are generally in the state of cut grinding heads. The original treatment is to cut by the grinding wheel blades and then grind the grinding heads. The grinding wheel cutting generates a lot of dust, and the grinding wheel chips particles will enter the inner surface of the steel pipe after cutting. At the same time, when cutting the head and tail, small burrs in the cut parts of individual steel pipes may not be removed due to operational problems and remain at the end of the pipe, seriously affecting the quality of the inner wall.
Solution: Use alloy blade cutting and chamfering. First, it eliminates dust and debris generated in the cutting process. Second, the chamfering is processed by turning, and the end face is a smooth trapezoidal end face, which can meet the requirements of preventing debris from being brought, thereby ensuring that metal chips not be brought for each pipe and avoiding pitting or scratching the inner wall.
2.3 The oil removal residue of the pipe being sintered during subsequent solid solution treatment
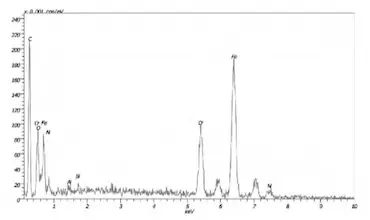
Since the last cold processing of the finished pipes is cold rolling, oil removal is required before solid solution treatment, and the inner and outer walls of the pipes should be rinsed with deionized water. The rolling oil on the inner and outer surfaces of the pipes should be completely removed before they can be transferred to solid solution. However, the current diameter of the inner hole of the pipe is less than ¢8mm, which is too small. In the water flushing of the deionized process, the grease and degreaser peeled off the surface of the pipe cannot be completely removed. After the pipe is dried, the remaining grease particles will remain on the surface of the pipe. In the subsequent solution treatment of the pipe, after being heated to a high temperature of about 1000°, the remaining grease particles will be carbonized and adhere to the inner wall of the pipe to form attachments. The results of the energy spectrum analysis of attachments on the inner wall of a 0Cr18Ni9 pipe are shown in Figure 5. As can be seen from Figure 5, the content of C and O in this part is much higher than that of the matrix. In the ultrasonic flaw detection process of the finished product, it can be detected and identified as a defect, resulting in a decrease in the pipe’s qualification rate.
This problem can be solved by upgrading the oil removal equipment, using reasonable tooling fixtures and electronic control systems, extending the flushing time of a single pipe to 10 minutes, and using drying by hot air in a timely manner after flushing.

Figure 5 Energy spectrum analysis results of attachments on the inner wall of a 0Cr18Ni9 pipe
3. Improvement effect
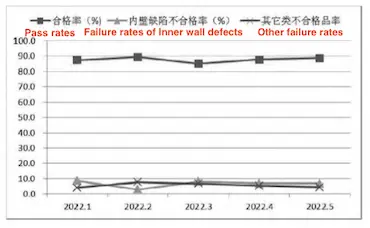
After adopting the above improvement measures, the company's statistical results of the inspection yield of all aviation stainless steel pipes from January to May 2022 are shown in Figure 6. As can be seen from Figure 6, the proportion of qualified products has increased to more than 85%, and the proportion of unqualified products caused by inner wall defects has dropped to less than 10%. The quality improvement effect is significant.

Figure 6